Streaming Ona Data with NiFi, Kafka, Druid, and Superset
A common need across all our projects and partners’ projects is to build up-to-date indicators from stored data. We have built dashboards showing project progress and other stakeholder-relevant information in our malaria spraying project (mSpray), drought response monitoring project in Somalia, and electronic medical record system (OpenSRP). Currently we create indicators on an ad-hoc basis, but we are in the process of building a unified pipeline to move data from heterogenous systems into a data warehouse and build indicators on top of this data.
This need breaks down into the following minimal requirements:
- Store data
- Store queries relative to the data
- Retrieve the results of queries executed against the latest data
The queries may be complex, e.g. containing grouping, filtering, and aggregation clauses, and the datasets may be large, e.g. hundreds of millions of rows. In order to use this information in on-demand dashboards, we must be able to retrieve the results of these complex queries in ~100ms. We would also like to build in the flexibility to expand the system over time to handle complex event processing and machine learning tasks. To handle these requirements we are building a system composed of the follow tools:
- Data ingestion using Apache NiFi
- Data warehousing in the Hadoop File System (HDFS)
- Stream processing using Apache Kafka
- OLAP database storage using Druid
- Visualization using Apache Superset
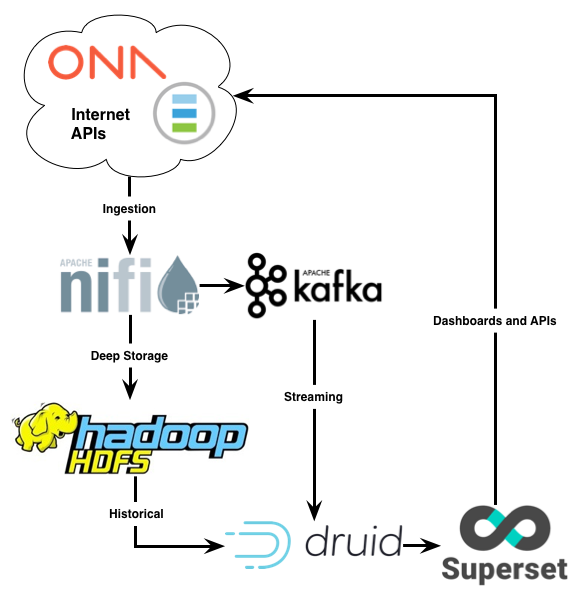
When all integrated, the data flow looks like this:
Below we will walk through what we’ve done so far to build this system and provide instructions that you can follow along to get it set-up yourself for testing. The below is useful to understand the different tools and the processes they rely on.
Note that the below is not designed for a production environment, although the overall structure is the same. In production environments we use a number of automated infrastructure, monitoring, and redundancy tools that are not discussed here.
The below would be much easier to get up and running using Docker or another container system. To get a deeper understanding of how everything works under the hood, we did not use that approach. We would love for someone to contribute a Docker file combining all the below tools, let us know if you do and we will post an update.
Note that the Hortonworks Dataflow (HDF) platform provides a Docker file containing a superset of the above tools, and this GoDataDriven article describes a similar setup and includes a Docker file using Divolte (a clickstream collector) instead of NiFi.
Data Ingestion and Coordination using NiFi
To coordinate the tasks of retrieving data from multiple APIs, minimally transforming it, and appropriately routing it, we use Apache NiFi. We are going to use NiFi to pull historical data from the Ona API and push that data into Kafka and HDFS for later processing. (Future Work has a description of how we do this in production.)
On macOS we can install NiFi with brew install nifi, and then run it with:
/usr/local/bin/nifi run
Note that if you installed NiFi using homebrew on macOS the logs are available with
tail -f /usr/local/Cellar/nifi/1.3.0/libexec/logs/nifi-app.logsubstituting your version number if different from
1.3.0.
After that NiFi will be available on http://localhost:8080/. Once you have loaded NiFi you can create processor to fetch, store, or process data as well as describe the connections between these processor. To get started quickly here’s a Ona API NiFi flow in XML. This lets you pull data from the Ona API every 60 seconds and route it to Kafka. The imported flow will look like below:
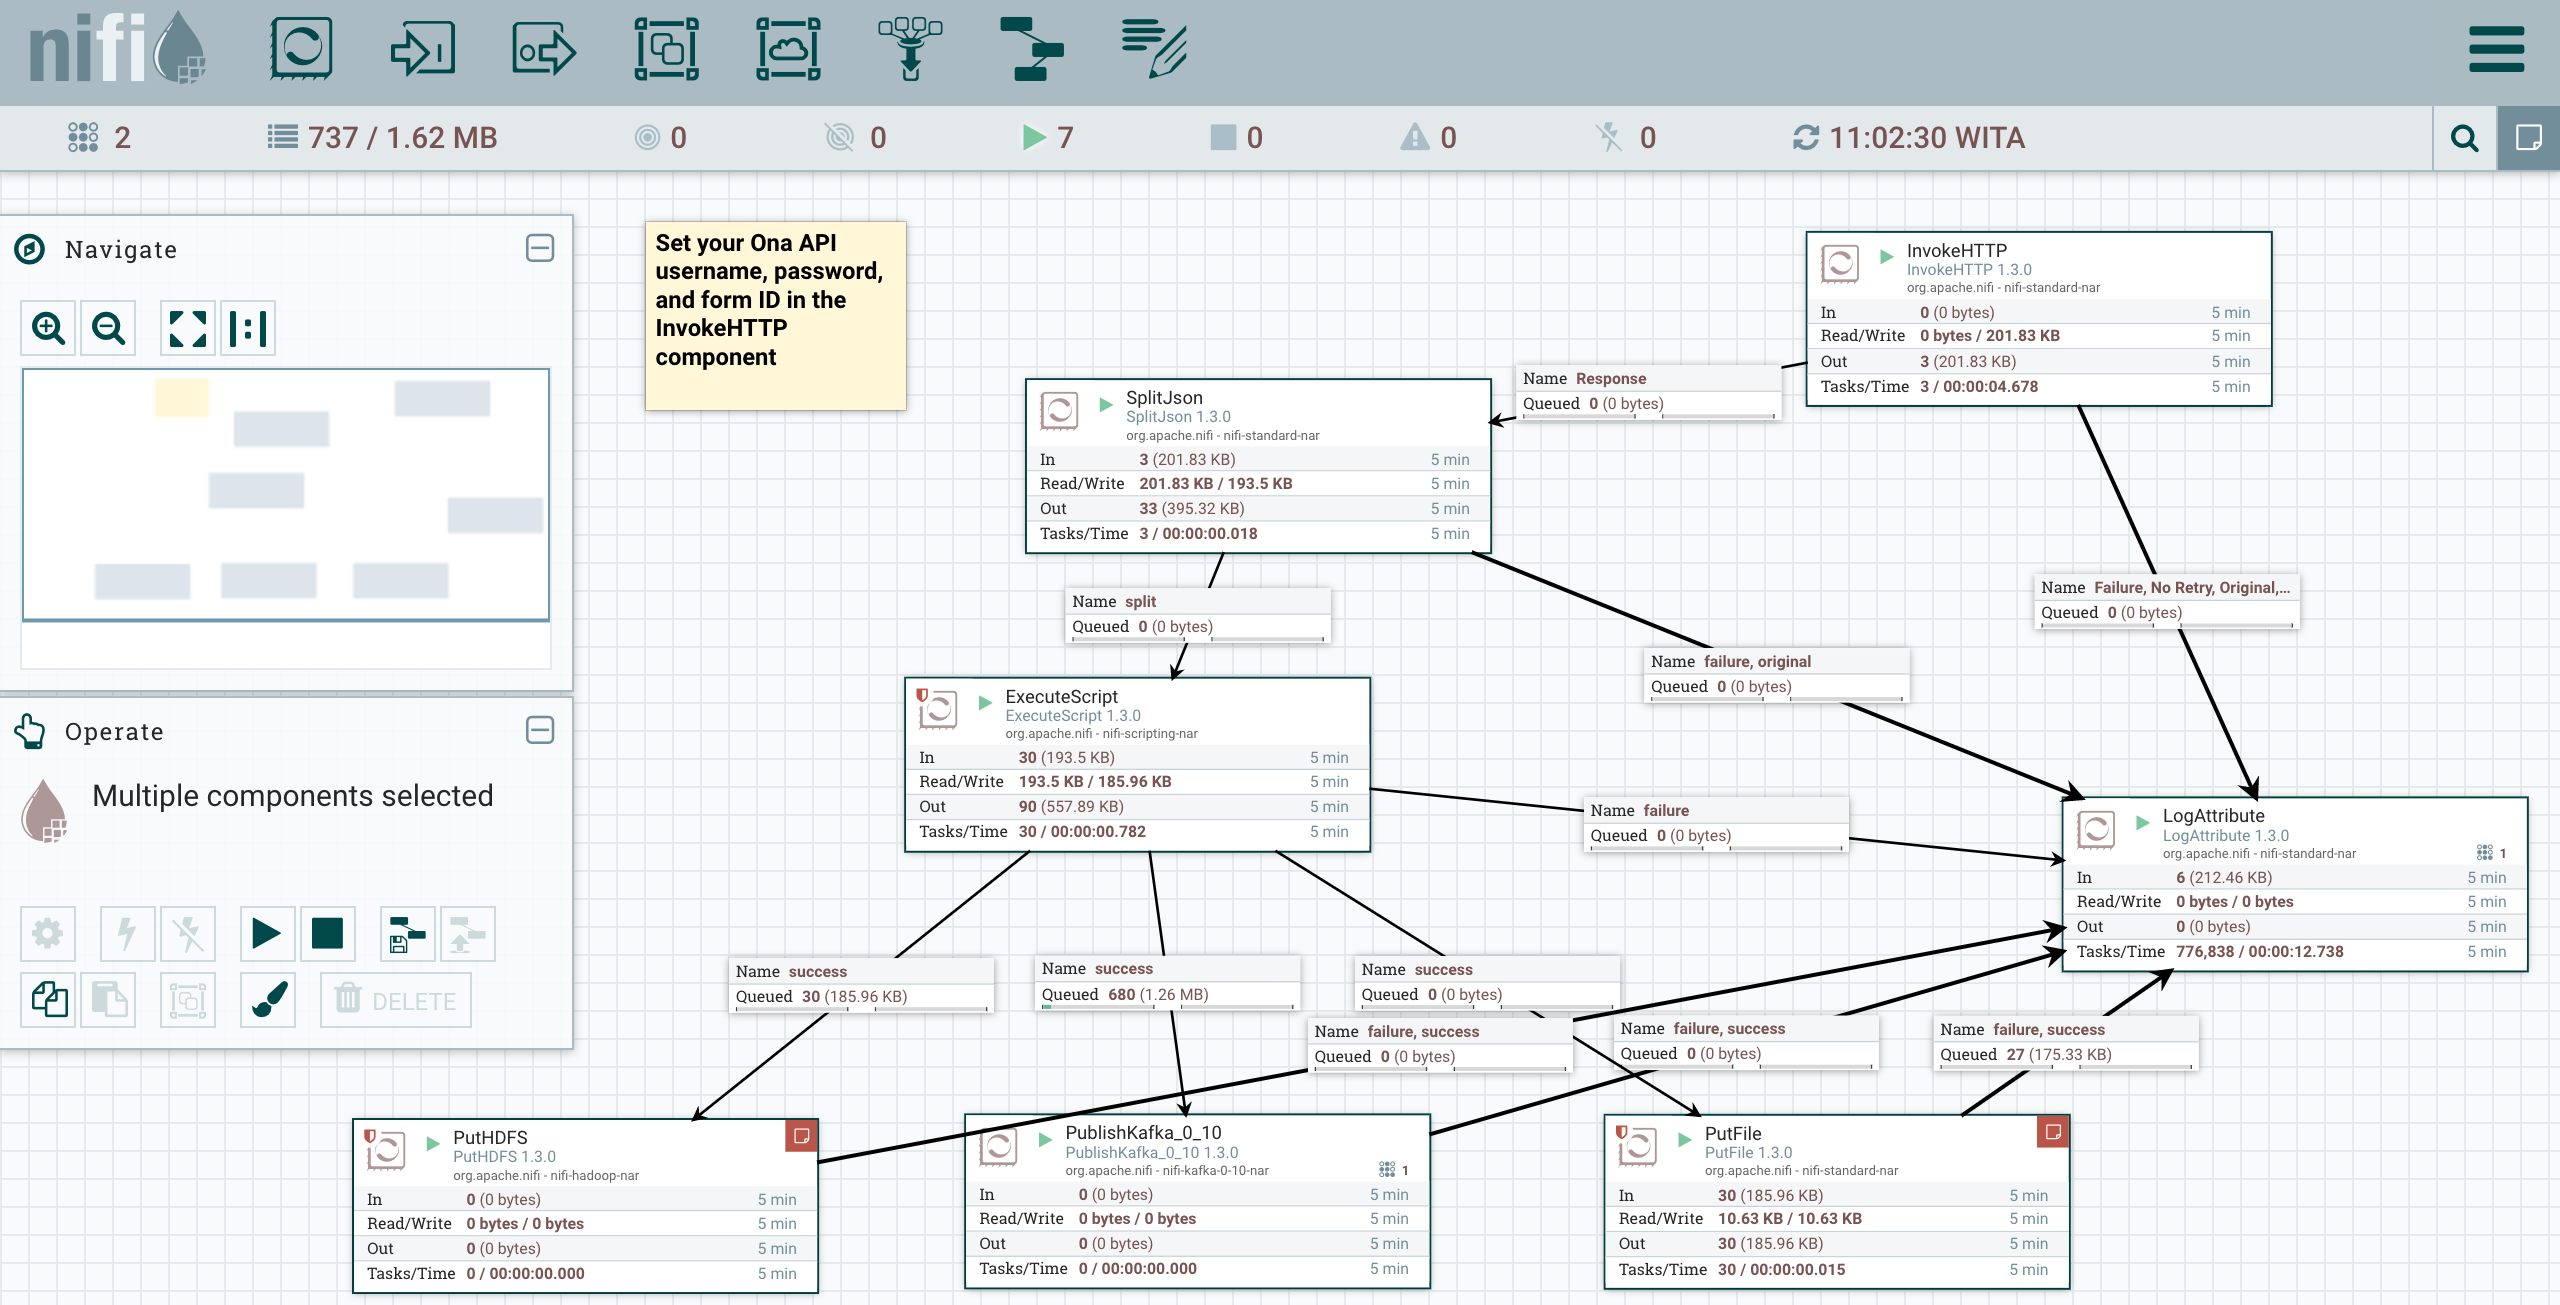
If you read through the flow, you’ll see that we do a number of preprocessing steps before writing the data. When InvokeHTTP runs it will output API data which is an array of JSON maps. We then convert this batch output into a single output per JSON map using the SplitJSON component. This will, for example, take a single record that is an array of 10 JSON maps and convert it into 10 records, each of which is a single JSON map.
var flowFile = session.get();

if (flowFile != null) {
  var StreamCallback =  Java.type("org.apache.nifi.processor.io.StreamCallback");
  var IOUtils = Java.type("org.apache.commons.io.IOUtils");
  var StandardCharsets = Java.type("java.nio.charset.StandardCharsets");

  flowFile = session.write(flowFile,
    new StreamCallback(function(inputStream, outputStream) {
        var text = IOUtils.toString(inputStream, StandardCharsets.UTF_8);
        var obj = JSON.parse(text);
        for (var key in obj) {
          value = obj[key];
          if (typeof value === 'object') {
            obj[key] = JSON.stringify(value);
          }
          newKey = key.replace(/\//g, '-');
          if (newKey !== key) {
            obj[newKey] = obj[key];
            delete obj[key];
          }
        }
        outputStream.write(JSON.stringify(obj, null, '\t').getBytes(StandardCharsets.UTF_8));
    }))
  flowFile = session.putAttribute(flowFile, 'filename', flowFile.getAttribute('filename').split('.')[0] + '_translated.json');
  session.transfer(flowFile, REL_SUCCESS);
}
Because the Ona data is based on the XForm spec, keys in this JSON map may have forward slashes (/) in them, and values may have nested JSON. If Druid encounters either of these in a JSON map it will not be able to process it. Therefore, we use an ExecuteScript processor to convert /s into -s and nested JSON maps into strings. The ECMAScript Script Body used by the ExecuteScript processor is above, this code was inspired by this Fun with Apache NiFi article. (The future Work section below has a description of how we better handle nested JSON in production.)
Because Ona’s data is only accessible securely over HTTPS, we must configure NiFi to work over SSL. To do this we will use the Java keytool to create a KeyStore and a TrustStore. Then we will import an RSA certificate into our local TrustStore.
To do this, first download a root certificate from the SSL certificate used by Ona (or whatever other HTTPS service your API is hosted behind), here’s Ona’s USERTrustRSACertificationAuthority.crt. Next update the first two lines of the below script with your own passwords and run the script in the same location you’ve downloaded the root certificate:
KEYPASS=changeme
STOREPASS=changeme

echo "Generate server certificate and export it"
${JAVA_HOME}/bin/keytool -genkey -alias server-alias -keyalg RSA -keypass $KEYPASS -storepass $STOREPASS -keystore keystore.jks
${JAVA_HOME}/bin/keytool -export -alias server-alias -storepass $STOREPASS -file server.cer -keystore keystore.jks

echo "Create trust store"
${JAVA_HOME}/bin/keytool -import -v -trustcacerts -alias server-alias -file server.cer -keystore cacerts.jks -keypass $KEYPASS -storepass $STOREPASS

echo "Import CA certificate"
${JAVA_HOME}/bin/keytool -importcert -file USERTrustRSACertificationAuthority.crt -alias RSA -keystore cacerts.jks -storepass $STOREPASS
This will create the KeyStore keystore.jks and the TrustStore cacerts.jks with the RSA certificate loaded into it. It will also create a server.cer, which we can ignore.
To use these new certificates, select the InvokeHTTP processor, then in its Configuration under PROPERTIES, click on the arrow as below:
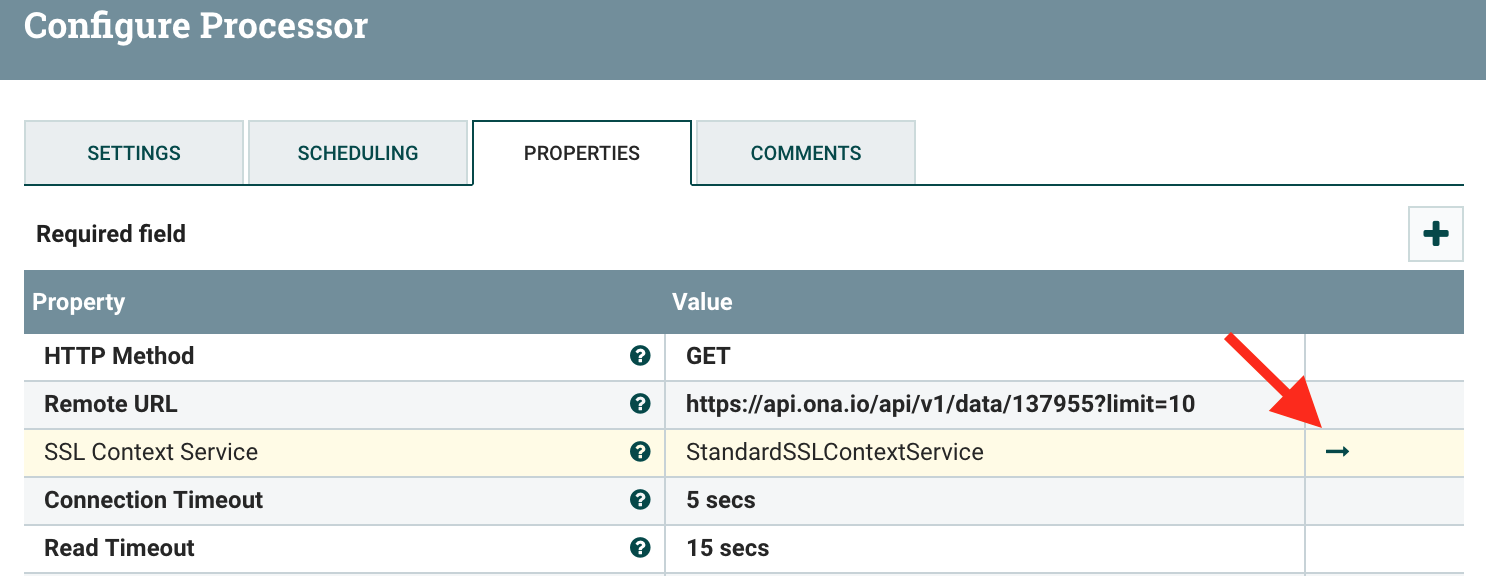
In the new modal window select the StandardSSLContextService, then hit the info circle to edit its properties. Now set the Keystore Type and Truststore Type to JKS, then the Keystore Filename to the location of your KeyStore and the Truststore Filename to the location of your TrustStore. Finally, set the passwords to the values you provided in the above script. Hit OK, then use the lightning bolt on the righthand side of the row to enable your new ContextService. If all goes well you should now be able to connect to HTTPS URIs.
To get some data, go back to the flow window, edit the InvokeHTTP component to set your Ona username, password, and form ID in the URL field. Edit the PutFile component to specify a directory to write flat files to (this is useful for debugging the data returned by the API and processed by NiFi). Now start the InvokeHTTP, LogAttribute, SplitJson, ExecuteScript, and PutFile processes. You should see queues filling and files accumulating in the directory that you have specified. If all looks good, stop the processes and let’s move on to the next step.
Real-time Stream Processing using Kafka
Apache Kafka is a real-time stream processor that uses the publish-subscribe message pattern. We will use Kafka to receive incoming messages and publish them to a specific topic-based queue that Druid will subscribe to. The Druid indexer will read off these messages and insert them into its database. As of this writing, the latest Kafka version that NiFi components support is 0.10, therefore we will install the 0.10 version of Kafka. Use the below commands to download version 0.10, extract it, and change to its directory:
curl -O http://www-us.apache.org/dist/kafka/0.10.0.0/kafka-0.10.0.0-src.tgz
tar xzvf kafka_2.10-0.10.0.0.tgz
cd kafka_2.10-0.10.0.0
For our simple local set-up we will use the default configurations. To manage the Kafka process, and later the Druid processes, we will first start the ZooKeeper task manager:
./bin/zookeeper-server-start.sh config/zookeeper.properties
Leave this running and open a new console in which to start the Kafka process:
./bin/kafka-server-start.sh config/server.properties
To view the clusters and topics we will install the Kafka Manager. This allows us to easily proof check the insertions we are performing, and more quickly surface any errors we might encounter. To install Kafka Manager, first clone the github repository and change to its directory:
git clone https://github.com/yahoo/kafka-manager.git
cd kafka-manager
Next we’ll build the Kafka Manager and run it in the foreground. Since this is a Scala project be sure you have the Scala Build Tool (sbt) installed, e.g. brew install sbt.
sbt clean dist
./kafka-manager-1.3.3.13/bin/kafka-manager
With the Kafka Manager running you can visit http://localhost:9000/ to view the current Kafka Clusters, Topics, and Consumers.
High performance queries with Druid
Druid is a column-oriented data store, comparable to Vertica, Apache Impala, or Dremel. To power the complex real-time queries that will build the data used in our dashboards we will index data in Druid. Once the data is indexed, we can use Superset for exploratory analysis and to define the JSON queries that we will execute against the Druid API and use to build our dashboards.
To start up Druid, first get the latest Druid source code, decompress it, and change into its directory:
curl -O http://static.druid.io/artifacts/releases/druid-0.10.1-bin.tar.gz
tar xzvf druid-0.10.0-bin.tar.gz
cd druid-0.10.0
To start the Druid services required for our use case, we will run five processes. There will be one process each for:
- a historical data server,
- a server broker,
- a server coordinator,
- a server overlord (the master manager),
- and a server middle manager.
To do this, run each of the below commands in a separate console window:
java `cat conf-quickstart/druid/historical/jvm.config | xargs` -cp "conf-quickstart/druid/_common:conf-quickstart/druid/historical:lib/*" io.druid.cli.Main server historical
java `cat conf-quickstart/druid/broker/jvm.config | xargs` -cp "conf-quickstart/druid/_common:conf-quickstart/druid/broker:lib/*" io.druid.cli.Main server broker
java `cat conf-quickstart/druid/coordinator/jvm.config | xargs` -cp "conf-quickstart/druid/_common:conf-quickstart/druid/coordinator:lib/*" io.druid.cli.Main server coordinator
java `cat conf-quickstart/druid/overlord/jvm.config | xargs` -cp "conf-quickstart/druid/_common:conf-quickstart/druid/overlord:lib/*" io.druid.cli.Main server overlord
java `cat conf-quickstart/druid/middleManager/jvm.config | xargs` -cp "conf-quickstart/druid/_common:conf-quickstart/druid/middleManager:lib/*" io.druid.cli.Main server middleManager
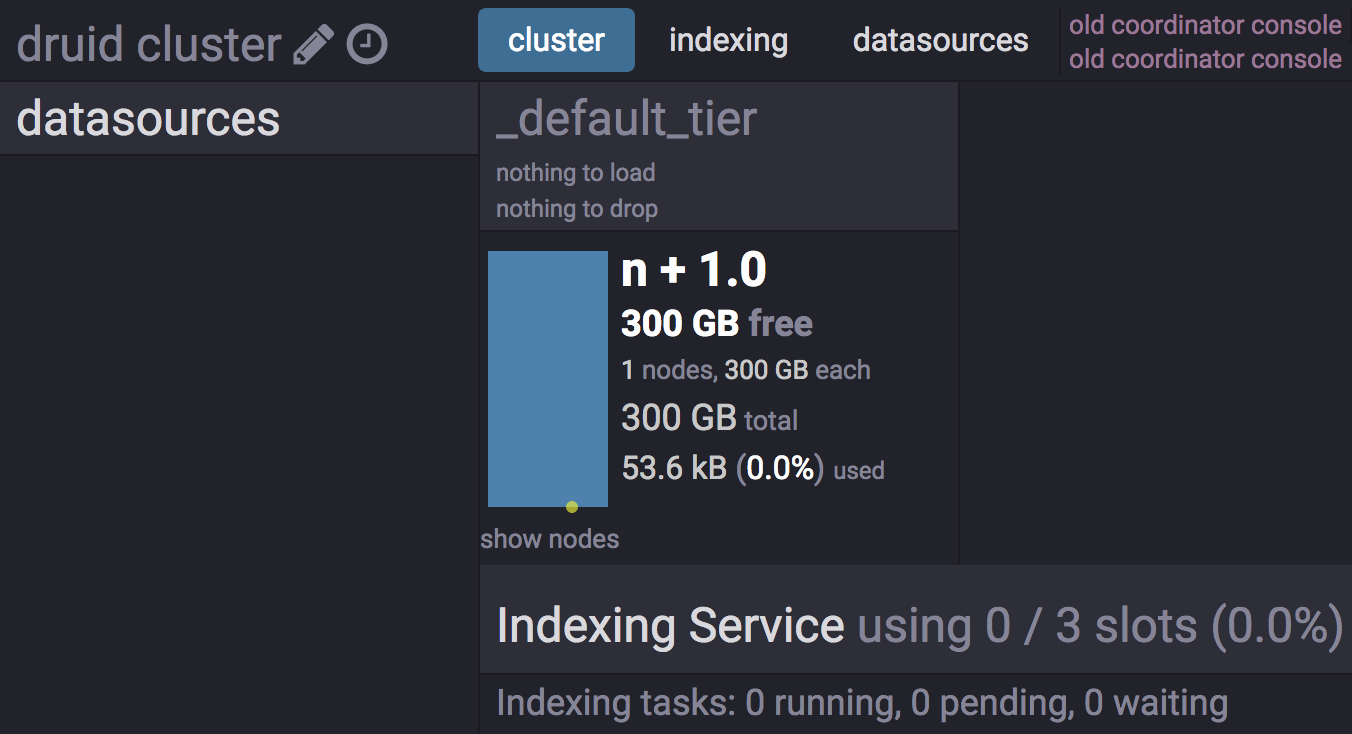
After starting the above processes, check the Druid Console at http://localhost:8081 to make sure everything looks good.
To manage the continuous process that indexes Kafka data, we’ll download, change directories, and run Druid’s Tranquility extension. Assuming you’re in the same directory with the folder that Druid 0.10 was installed, use the following to get the lastest version and decompress it:
curl -O http://static.druid.io/tranquility/releases/tranquility-distribution-0.8.0.tgz
tar xzvf tranquility-distribution-0.8.0.tgz
cd tranquility-distribution-0.8.0
To read from a Kafka stream we will define a configuration file to describe a data source name, a Kafka topic to read from, and some properties of the data that we read. Save the below JSON configuration as ona-kafka.json and place in the same directory as Druid:
{
  "dataSources" : {
    "ona-kafka" : {
      "spec" : {
        "dataSchema" : {
          "dataSource" : "ona-kafka",
          "parser" : {
            "type" : "string",
            "parseSpec" : {
              "timestampSpec" : {
                "column" : "_submission_time",
                "format" : "auto"
              },
              "dimensionsSpec" : {
                "dimensions" : [],
                "dimensionExclusions" : [
                  "timestamp",
                  "value"
                ]
              },
              "format" : "json"
            }
          },
          "granularitySpec" : {
            "type" : "uniform",
            "segmentGranularity" : "six_hour",
            "queryGranularity" : "none"
          },
          "metricsSpec" : []
        },
        "ioConfig" : {
          "type" : "realtime"
        },
        "tuningConfig" : {
          "type" : "realtime",
          "maxRowsInMemory" : "100000",
          "intermediatePersistPeriod" : "PT10M",
          "windowPeriod" : "PT720000M"
        }
      },
      "properties" : {
        "task.partitions" : "1",
        "task.replicants" : "1",
        "topicPattern" : "ona-api-test"
      }
    }
  },
  "properties" : {
    "zookeeper.connect" : "localhost",
    "druid.discovery.curator.path" : "/druid/discovery",
    "druid.selectors.indexing.serviceName" : "druid/overlord",
    "commit.periodMillis" : "15000",
    "consumer.numThreads" : "2",
    "kafka.zookeeper.connect" : "localhost",
    "kafka.group.id" : "tranquility-kafka"
  }
}
This instructs Tranquility to read from the topic ona-api-test and push the messages that it receives into a Druid data source called ona-kafka. In the messages it reads Tranquility uses the _submission_time column (or key) to represent the time stamp. What is particularly unusual about this file is that we set a very large windowPeriod of PT720000M. We do this because Druid will ignore any messages with times outside of the windowPeriod. Because we are using historical data for this test, our time stamps are outside of the typical hour or so window period.
We can start an indexer task using our ona-kafka.json spec with:
bin/tranquility kafka -configFile ../druid-0.10.0/ona-kafka.json
Alternatively, it is possible to put data directly into Druid and skip the NiFi and Kafka steps. If you would like to do this you can use the below JSON configuration:
{
  "type" : "index_hadoop",
  "spec" : {
    "ioConfig" : {
      "type" : "hadoop",
      "inputSpec" : {
        "type" : "static",
        "paths" : "/path/ona-api-demo.json"
      }
    },
    "dataSchema" : {
      "dataSource" : "ona-json",
      "granularitySpec" : {
        "type" : "uniform",
        "segmentGranularity" : "day",
        "queryGranularity" : "none",
        "intervals" : ["2016-07-29/2016-07-30"]
      },
      "parser" : {
        "type" : "hadoopyString",
        "parseSpec" : {
          "format" : "json",
          "dimensionsSpec" : {
            "dimensions" : [
            ]
          },
          "timestampSpec" : {
            "format" : "auto",
            "column" : "_submission_time"
          }
        }
      },
      "metricsSpec" : []
    },
    "tuningConfig" : {
      "type" : "hadoop",
      "partitionsSpec" : {
        "type" : "hashed",
        "targetPartitionSize" : 5000000
      },
      "jobProperties" : {}
    }
  }
}
This assumes you have valid JSON data from the Ona API in the file
/path/ona-api-demo.jsonthat has been transformed to remove/s in keys and to remove nested JSON in values. It also assumes that the_submission_timeof the data is between the value inintervals. Go ahead and adjust those based on your demo data. Assuming you have saved an adjusted configuration file like the above toona-api-index.json, you can load a demo JSON file into Druid using:curl -X 'POST' -H 'Content-Type:application/json' -d @ona-api-index.json localhost:8090/druid/indexer/v1/task
Visualization with Superset
Superset lets us explore the data in our Druid index and build interactive JSON queries which we can later use to power dashboards. To get this up and running we will first need to install Superset. You can follow the instructions in the Superset Getting Started or, assuming you have installed Python’s virtualenvwrapper, use the below commands for macOS, which are mainly taken from there:
# Install required libraries
brew install pkg-config libffi openssl python

# Install the python cryptography library
env LDFLAGS="-L$(brew --prefix openssl)/lib" CFLAGS="-I$(brew --prefix openssl)/include" pip install cryptography==1.7.2

# Create a virtual environment
mkvirtualenv superset

# Upgrade your new virtual environment
pip install --upgrade setuptools pip

# Install superset
pip install superset

# Create an admin user (you will be prompted to set username, first and last name before setting a password)
fabmanager create-admin --app superset

# Initialize the database
superset db upgrade

# Load some data to play with
superset load_examples

# Create default roles and permissions
superset init
Then, start Superset with:
# Start the web server on port 8088, use -p to bind to another port
superset runserver
Finally, we need to add a Druid cluster in Superset so that we can access the data stored in the Druid index. To do this, visit the dashboard at http://localhost:8088, then navigate to the Sources item in the top menu bar then choose the Druid Clusters option.
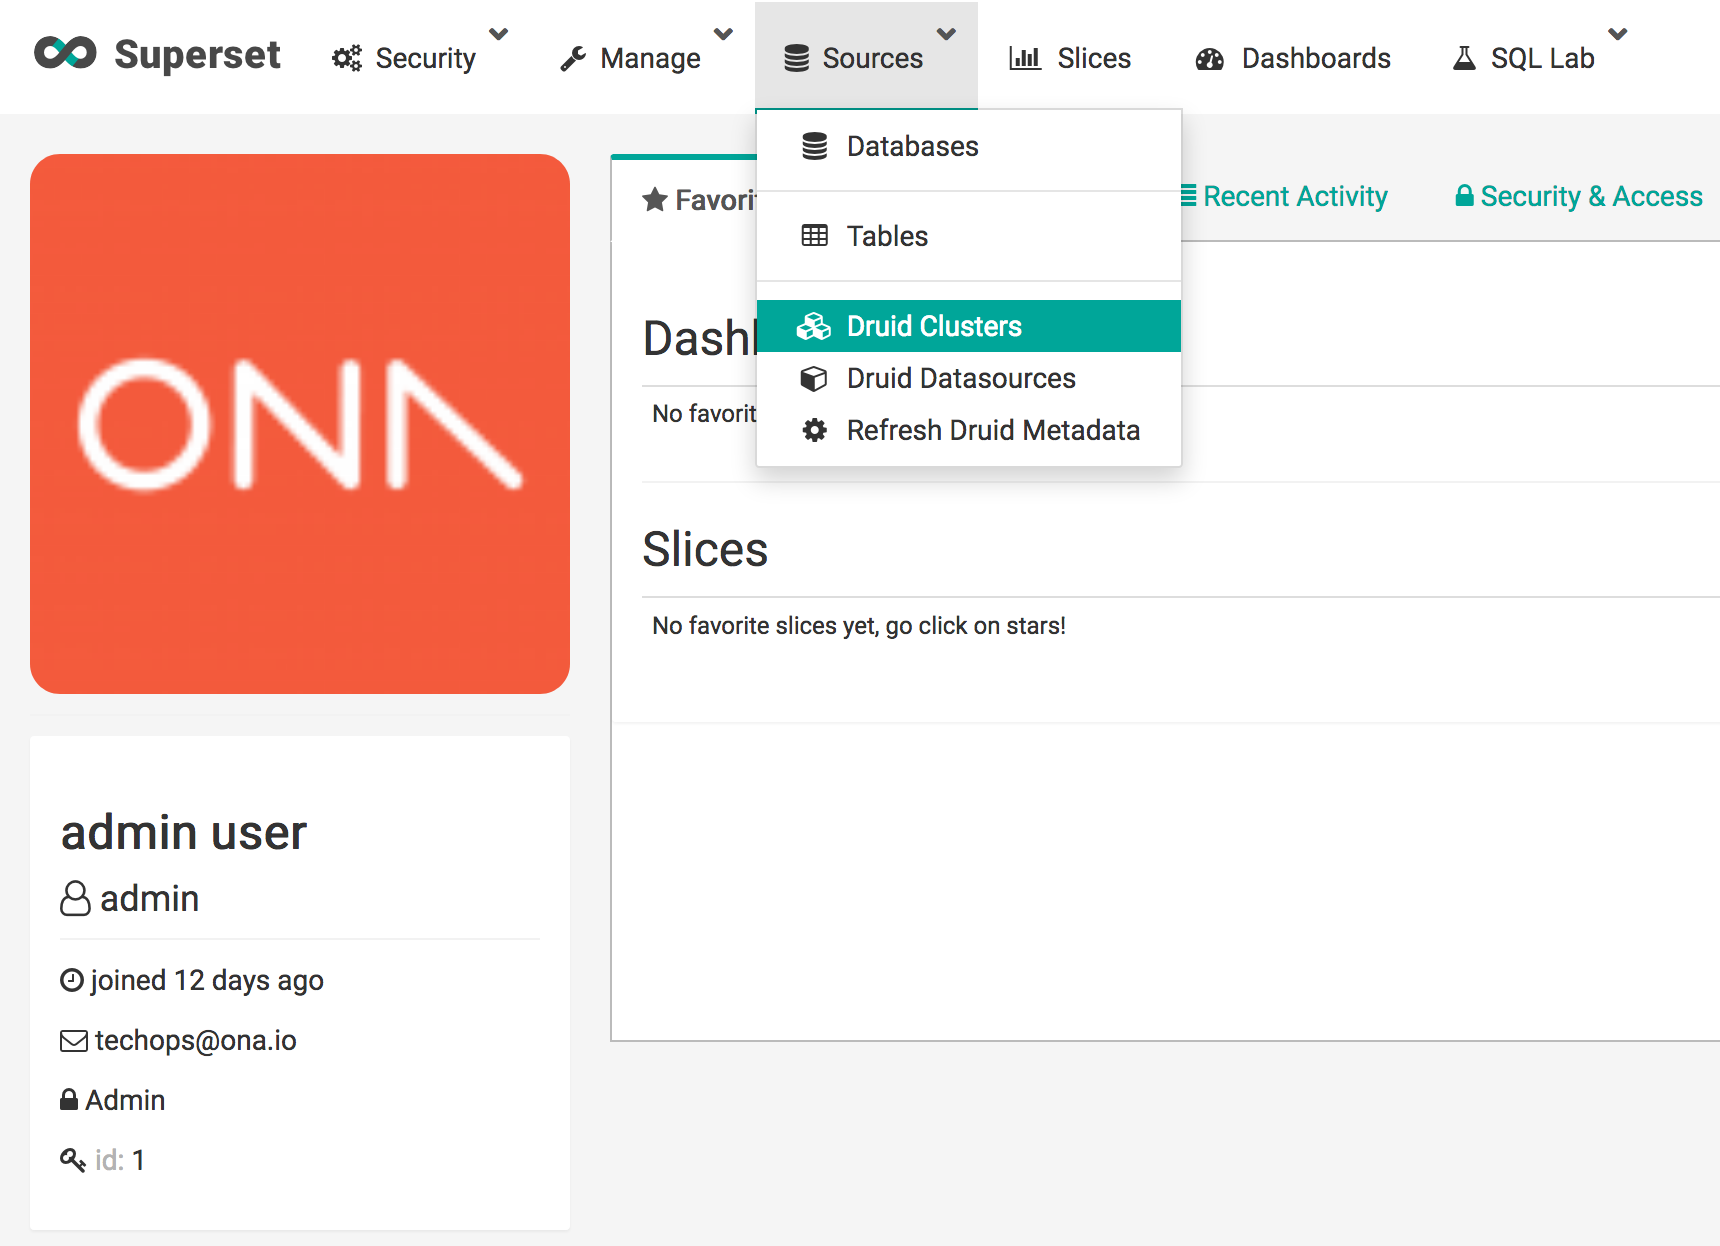
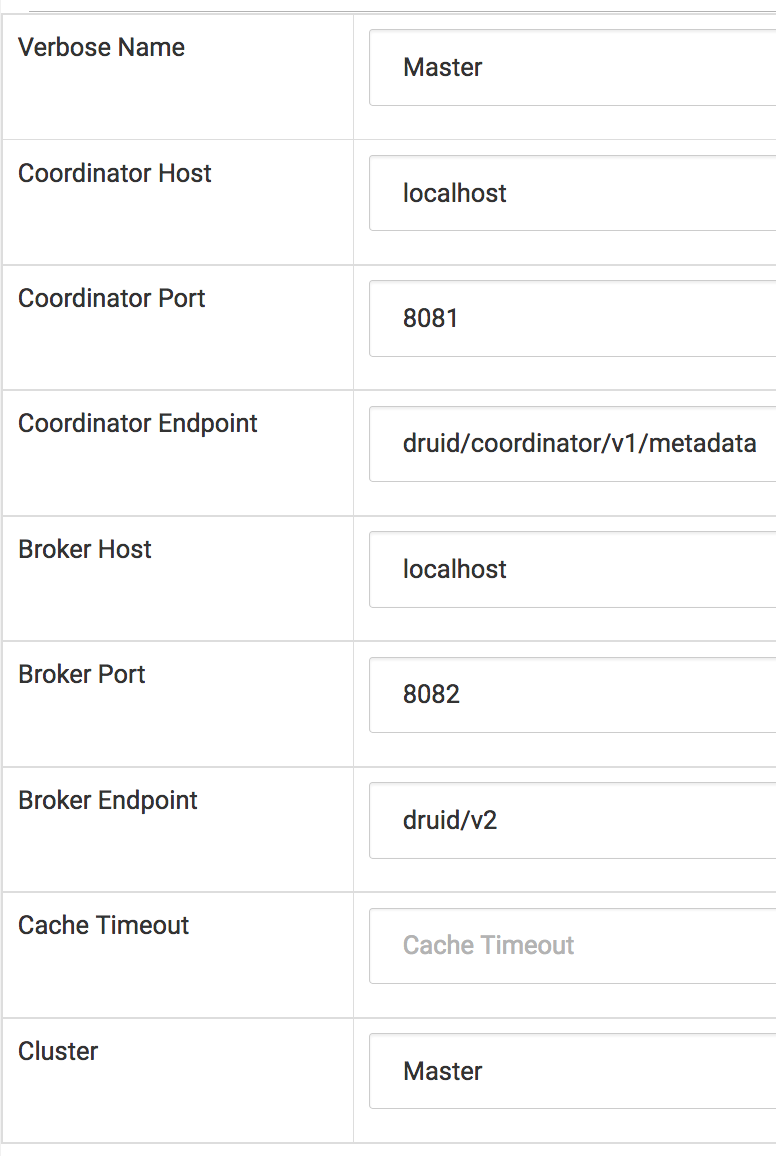
This list should be empty. Hit the teal plus button on the left hand side and enter the below information for your new Druid Cluster.
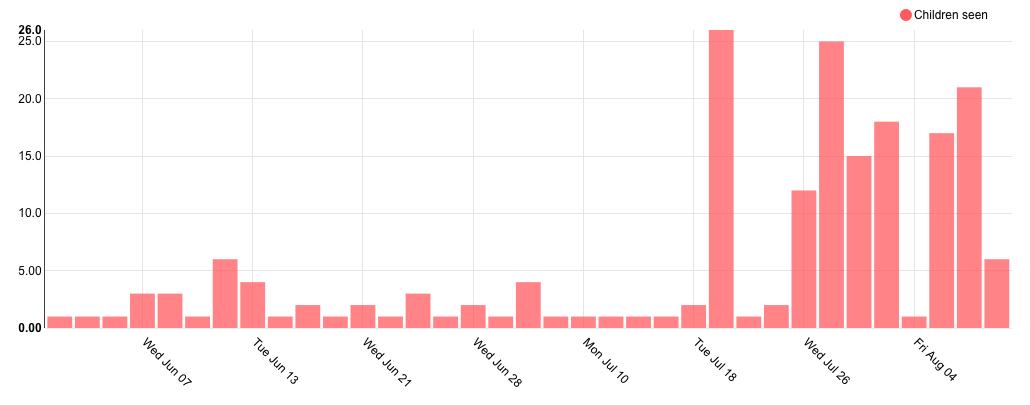
Now return to the Sources menu at the top and select Refresh Druid Metadata. After this, again in the Sources menu, navigate to Druid Datasources and you will see your ona-json Datasource. This is the datasource either streaming in, if you used the NiFi and Kafka setup, or from the static JSON file, if you posted data to the indexer.
You can now use SuperSet to explore this dataset. Try creating some queries against it and visualizing the outputs.
Future Work
Differentiate Batch and Stream Ingestion
Using NiFi to push pulled-data from the API into Kafka was only for the purposes of this proof of concept. In production we will handle streaming data by setting up a listener that receives Ona webhooks containing real-time create, update, and delete events then pushes these into Kafka and HDFS.
We will still use one-time pulls from the API to synchronize historical data from Ona into HDFS and then into Druid. We will begin by using NiFi for this task, but plan to explore alternative tools as well.
Handling Nested JSON
We mentioned above that Druid is not able to index nested JSON, which our records contain, and that we avoid this problem by serializing the JSON values. This is obviously a problem because we cannot run queries against individual key values in the serialized JSON.
One potential solution is to build a semi-relational structure by adding a UUID to the incoming JSON and then inserting that as a foreign parent key in each nested JSON record with a label key whose value is the key of the nested JSON in the original record. For example, assuming we reserve the __.+__ namespace pattern for our internal keys:
{
  "key1": "value1",
  "key2": {
    "inner-key1": "inner-value1",
    "inner-key2": {
      "inner-inner-key1": "inner-inner-value1"
    }
  }
}
would become three records. The first of which is the outer record and has an assigned __uuid__:
{
  "__uuid__": "AAAA",
  "key1": "value1"
}
The second of which is the first nested JSON map referencing its parent through __parent__ and storing its original key in __label__:
{
  "__uuid__": "BBBB",
  "__parent__": "AAAA",
  "__label__": "key2",
  "inner-key1": "inner-value1"
}
The third of which is the doubly nested JSON map only referencing its immediate parent:
{
  "__uuid__": "CCCC",
  "__parent__": "BBBB",
  "__label__": "inner-key2",
  "inner-inner-key1": "inner-inner-value1"
}
This structure allows children to easily query parents but not the other way around. To let parents query their children, we could store the child UUID as the value for the what used to be a nested JSON map:
{
  "__uuid__": "AAAA",
  "key1": "value1",
  "key2": "BBBB"
}
The major weakness of this approach is that it adds a significant amount of structural complexity to the datasets. Relatedly, if we expected all our records to have the same key-value pairs, they no longer would. An alternative approach is to flatten our data by pushing all nested keys to the top layer and renaming these keys using the parent keys as prefixes. Again reserving the __.+__ namespace pattern for generated keys and also using it as a separator, this would produce the following final JSON map when applied to the same example dataset:
{
  "key1": "value1",
  "__key2__inner-key1__": "inner-value1",
  "__key2__inner-key2__inner-inner-key1__": "inner-inner-value1"
}